Calculate the whole from a percent by using tape diagrams with this worksheet.
How Do You Use a Tape Diagram in Math?
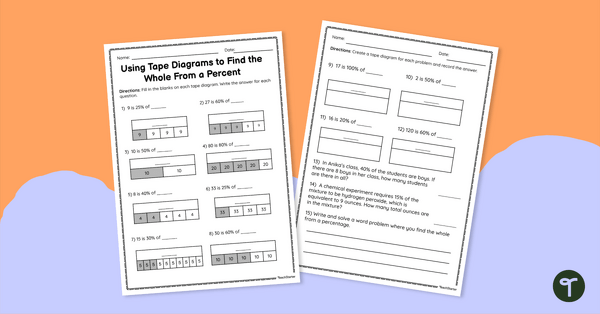
If you are wondering what a tape diagram is, you have come to the right place! A tape diagram, also known as a strip diagram, is a mathematical model your students can use with various math skills. Students may use tape diagrams when looking at part-part-whole relationships or when studying more challenging topics, such as calculating the whole when given a percent.
When using tape diagrams with percentages, the diagram can be broken down into pieces depending on the percentage used within the problem. Let’s take a look at an example. If your students are solving the problem, 27 is 60% of what number, the tape diagram can be broken down a couple of ways. Students can break the diagram into 10 pieces, each representing 10%. Another way to structure the diagram could be to break the visual into 5 pieces, with each piece representing 20%. Regardless of how many pieces the model is broken into, the student would insert the number 27 into each piece. To solve the problem, simply shade in the number of pieces that equal the percentage, in this case, 60%, and add the numbers together.
With this worksheet, students will practice filling in missing blanks on tape diagrams that have already been partially completed, as well as drawing their own models. Students will also solve a variety of word problems and create their own as well.
An answer key is included with your download to make grading fast and easy!
Tips for Differentiation + Scaffolding
In addition to independent student work time, use this worksheet as an activity for:
- Guided math groups
- Lesson wrap-up
- Fast finishers
- Homework assignment
- Whole-class review (via smartboard)
For students who need a bit of support, encourage them to solve the problems without using a tape diagram.
If students need additional help, students can first practice problems involving a smaller number of pieces in the tape diagram. These may include problems that require the student to use 25%, 33%, or 50%
🖨️ Easily Download & Print
Use the dropdown icon on the Download button to choose between the PDF or editable Google Slides version of this resource.
Because this resource includes an answer sheet, we recommend you print one copy of the entire file. Then, make photocopies of the blank worksheet for students to complete.
To save paper, we suggest printing this 2-page worksheet double-sided.
Turn this teaching resource into a sustainable activity by printing on cardstock and slipping it into a dry-erase sleeve. Students can record their answers with a whiteboard marker, then erase and reuse them.
Additionally, project the worksheet onto a screen and work through it as a class by having students record their answers in their notebooks.
Get more worksheets to have handy!
This resource was created by Cassandra Friesen, a teacher in Colorado and Teach Starter Collaborator.

0 Comments
Write a review to help other teachers and parents like yourself. If you'd like to request a change to this resource, or report an error, select the corresponding tab above.